Catching Pokémon is one of the most iconic and fundamental mechanics of the series. But have you ever wondered how the game determines whether a throw will succeed? Let’s break down the Pokémon catch rate formula, especially focusing on Generations III and IV, and use real examples to understand the numbers behind the catch. In this guide, we’ll learn how pokemon catch rate works in Gen(III-IV).
Table of Contents
What Is a Catch Rate?
Every Pokémon species has a base catch rate, which is an integer between 3 and 255. The higher this number, the easier it is to catch that Pokémon.
- Example: Caterpie has a base catch rate of 255 (easy), while Mewtwo has a base catch rate of 3 (extremely hard).
This value doesn’t tell the whole story, though. The actual catch probability depends on several dynamic modifiers, including the type of Poké Ball used, the target’s HP, and any status conditions.
The Gen III–IV Catch Rate Formula Explained
In Generations III and IV, the catch formula can be boiled down to this:
Mathematica: CatchValue = (((3 × Max HP − 2 × Current HP) × Catch Rate × Ball Modifier × Status Modifier) / (3 × Max HP))
Let’s break this down in plain English:
| Variable | What It Means |
| Max HP | The Pokémon’s total HP |
| Current HP | The Pokémon’s remaining HP |
| Catch Rate | The species’ base catch rate |
| Ball Modifier | Multiplier depending on which Poké Ball you used |
| Status Modifier | Bonus multiplier if the Pokémon is asleep, paralyzed, frozen, etc. |
This formula calculates a catch value that determines how likely a capture is. The game then runs a random check to finalize success.
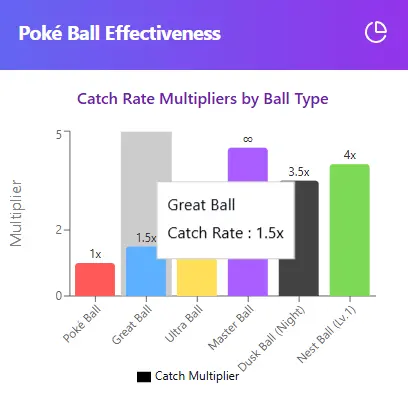
Ball Modifier Multipliers
The Poké Ball used has a big effect. Here are some typical values in Gen III–IV:
| Poké Ball | Modifier |
| Poké Ball | 1× |
| Great Ball | 1.5× |
| Ultra Ball | 2× |
| Net Ball (vs. Water/Bug) | 3× |
| Timer Ball (after 10 turns) | 4× |
Tip: Use situational balls like Dusk Ball in caves or Quick Ball early in battle to significantly increase catch chances. For a full reference on Poké Ball types and their effects, check Bulbapedia’s Poké Ball page.
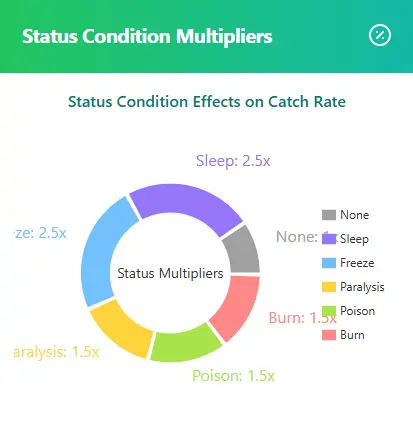
Status Condition Modifiers
Adding a status effect boosts your odds:
| Status Effect | Modifier |
| Sleep | 2.0× |
| Freeze | 2.0× |
| Paralysis | 1.5× |
| Burn/Poison | 1.5× |
| None | 1× |
Putting a Pokémon to sleep or freezing it gives you the highest status bonus.
Real Example: Catching Rayquaza in Gen III
Let’s say you’re facing Rayquaza in Pokémon Emerald.
- HP: 100% (full)
- Base Catch Rate: 3
- Ball: Ultra Ball (2×)
- Status: None
Plug the numbers into the formula:
Mathematica: CatchValue = (((3 × Max HP − 2 × Max HP) × 3 × 2 × 1) / (3 × Max HP))
= ((3MaxHP − 2MaxHP) × 6) / (3MaxHP)
= (1 × 6) / 3 = 2
The resulting catch value is very low, and since the max possible value is 255, you’re well below that. You’ll need to lower HP and add a status for better odds.
Read also: Pokémon Catch Rate vs. Catch Chance: What’s the Difference?
Catch Rate Probabilities by Scenario
Here’s how your success chances look with Rayquaza based on different strategies:
| HP Level | Status | Ball Type | Catch Rate |
| 100% | None | Ultra Ball | ~1% |
| 50% | Sleep | Ultra Ball | ~14% |
| 1 HP | Sleep | Ultra Ball | ~26% |
| 1 HP | Sleep | Timer Ball (30+ turns) | ~52% |
Pro tip: Combine False Swipe (to reduce HP to 1) and Sleep Powder for optimal catching conditions.
Advanced Mechanics: Critical Captures (Gen V+)
While not present in Gen III–IV, newer games introduce Critical Captures, which offer faster catches based on your Pokédex completion. Just a note in case you’re comparing mechanics across generations.
Using Catch Rate Calculators
Many online tools replicate these formulas and let you simulate catch odds by inputting:
- The Pokémon name or base catch rate
- HP percentage
- Chosen Poké Ball
- Status condition
- Turn count (for Timer Ball)
Instructions often sound like this:
“Enter the Pokémon’s HP, choose a status effect, and select your Poké Ball to view the capture probability.”
These calculators are invaluable for strategizing encounters with legendaries or limited-catch Pokémon.
Final Thoughts: Strategy Over Luck
Catching Pokémon in Gen III–IV isn’t just about spamming Ultra Balls—it’s about calculating your approach. Understanding the mechanics lets you:
- Save valuable balls
- Prepare smarter strategies
- Avoid frustrating, long battles
When you know the math, you’re no longer relying on luck you’re mastering the mechanics.